When you think of the word anatomy what images, thoughts, or symbols come to mind?
Okay, now pull out a piece of paper or a sketch pad and ponder on this question. Brainstorm a bit. Work fast. And then when you think you’ve exhausted all possible ideas, pause for a moment and think of a few more connections to this word. To help get you started, please, consider these images.

… a visual kick start for your brainstorm
Now imagine yourself swimming in symbolism — much like that frog before he/she met his/hers educationally-inspired demise.
Recently, I had the pleasure of attending a professional development workshop sponsored by the Mid-Atlantic Facilitators Network (a.k.a., MAFN). This workshop was one of the very best I had ever attended since becoming a facilitator. But rather than just make this claim and assume that you’ll accept my opinion as fact, let me tell you why.
Imagine you’re in a lab-class: Anatomy & Physiology 301. Let’s examine the structure and internal workings of what makes for an outstanding workshop.
… cleverly designed handouts should facilitate your note taking and engage you without distracting you from the speaker
Set the stage or prepare the operating room for use.
There’s usually time to settle into your learning space, greet a few of your colleagues, and perhaps introduce yourself to the workshop instructor/trainer. I highly recommend that you arrive a few minutes early to do just that. Gather up any handouts which are made available and review them so that you’ve a good grasp of what’s to be covered and in what order topics may be addressed.
When preparing a handout should you be the presenter, avoid designing a handout that’s jammed packed with text. Use “bullet lists” and leave enough white space for note taking and doodling. Bibliographies should list online references and are particularly helpful for those who want to “dive deep” and learn more.
Create a learning laboratory for hands-on, experiential engagement.

… learning occurs in a sequential and progressive fashion — in steps: 1, 2, 3.
It is not my intent to re-create the content or attempt to re-teach this workshop. Kudos to Rebecca Slocum who was the featured presenter at MAFN. The credit for the design and facilitative instruction at this event belongs to her. That said, look again at the photos above. Contemplate how our group learning evolved, step by step.
- The workshop leader/instructor tells a story about being stuck in Iceland … This story doubles as a self-introduction and opens the door to being genuine and personable.
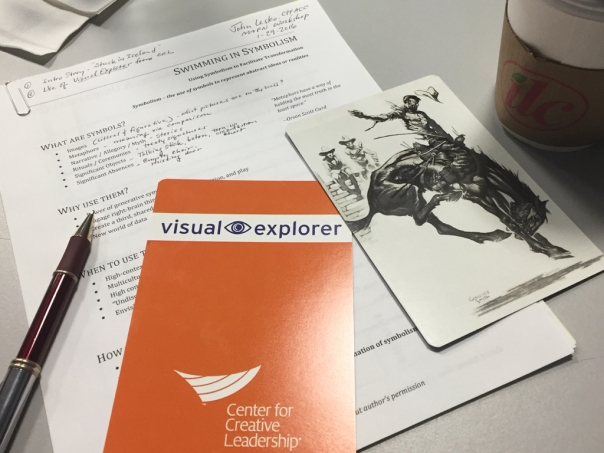
- The instructor uses several decks of Visual Explorer Playing Cards … Having us draw one card face up (representing our approach to facilitation) and a 2nd card face down (the mystery card) … We are up on our feet and engaged early in the program.
- We share our first card with our neighbors / table mates … This serves as a purposeful icebreaker with those who are in the room and learning with us.
- The instructor shares more of her agenda/syllabus with us … Covering the THEORY that behind the PRACTICE of our experiential learning.
- The 2nd card is flipped and now we are challenged to create meaning from this unknown image … We learn that symbolism works in several ways … In the example above, that flea or “bug” is something that trips me up while I’m a facilitator. It’s the “nit that must be picked” that detracts me or someone else in the group.
- The instructor leads more discussion on WHY USE SYMBOLS, WHEN TO USE THEM, and HOW TO USE THEM … More group discussion follows.
- We are asked to draw a 3rd card (face up) … This image is to explain how our practice as facilitators or our professional behavior might evolve and change in the future … I aspire to take a bird’s eye view of future situations yet understand that I’m at the mercy of the winds.
- A two-part case study follows … We are encouraged to take notes using a worksheet entitled: A Symbolic Framework … Our learning has been re-enforced.
Okay … I’m assuming that you’ve got the idea. Understanding the anatomy of a successful workshop helps guide us in the following ways:
- Be welcoming and friendly … Tell a story that triggers everyone’s curiosity.
- Engage your audience as soon as you can, early in the workshop, and before you dive into the “boring, academic” stuff.
- Lay out the steps — 1, 2, 3 — and explain each step as you go so that folks don’t get lost while “dissecting their frog.”
- Allow time for the participants to share their stories, feelings, and experiences.
- Test or challenge the learners with some sort of direct application of what they’ve just learned. Think: case studies, completing a worksheet, …, creating an action plan, etc.
I hope this helps. Good luck!
PS: Think of a way to extend the learning or build a sense of community with your colleagues and potential clients. For example after the MAFN workshop described above, our members and guests gathered at a nearby restaurant for networking and a social. There were free appetizers and a cash bar. But there was also a structured activity called the NAME TAG ICEBREAKER which I’ve attempted to explain below in a doodle/sketch-note.

… a name tag can be used creatively to enable purposeful networking